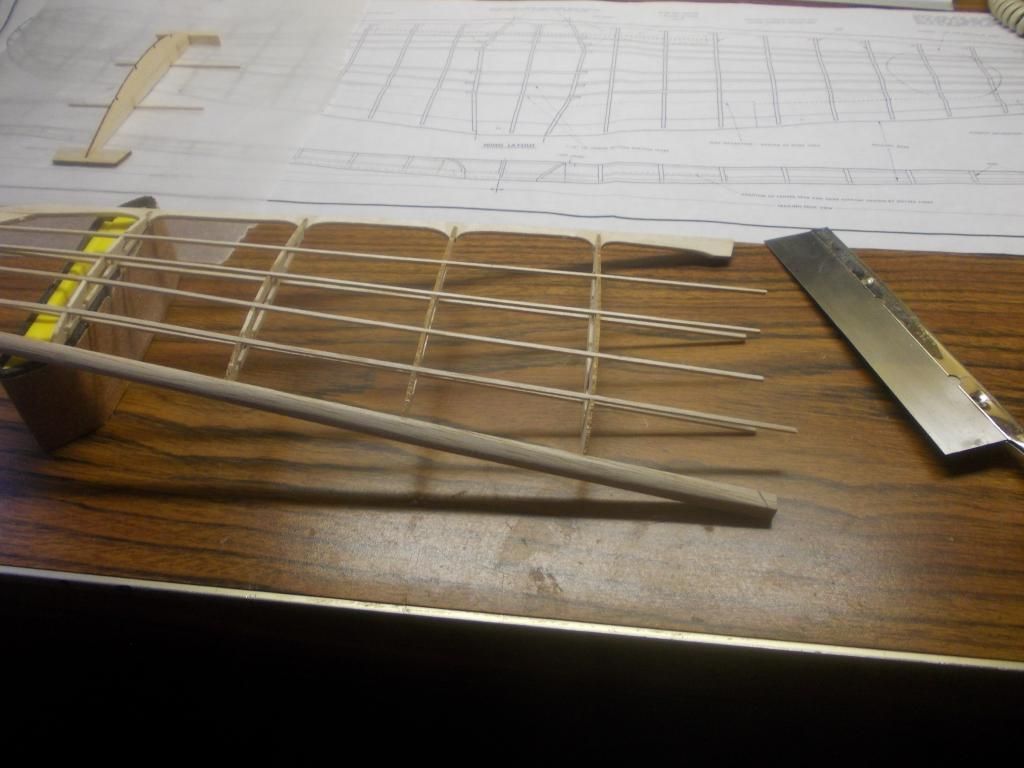
Here is a picture of my work so far. Kinda stumped on the wing through. It has the large stick as the edge gonna study this for a bit
400 series Zero 4th model
-
Angie332
- Posts: 93
- Joined: Wed Jun 25, 2014 10:21 am
400 series Zero 4th model
Starting my 4th model.. holy cow that is gonna be a big plane
Here is a picture of my work so far. Kinda stumped on the wing through. It has the large stick as the edge gonna study this for a bit
Here is a picture of my work so far. Kinda stumped on the wing through. It has the large stick as the edge gonna study this for a bit
You do not have the required permissions to view the files attached to this post.
-
Mitch
- Posts: 1351
- Joined: Mon Aug 22, 2011 9:16 pm
- Location: Kent, WA
Re: 400 series Zero 4th model
Angie,
The LE (Leading Edge) starts out with the 1/4" sq stock. I build the center section first, then remove it. The LE cut to exact size.
Then build the port and stbd wings with the LE just a bit long. Then I mark the angle of the joint with a pencil, then while propping up the wing to the correct dihedral I make my cut with a Razor Saw. This way you are making 2 angle cuts at the same time. (I have pictures, but am having difficulty with photobucket in Kodiak today)
If you do not have a Razor Saw, make several careful cuts with your xacto knife on the mark.
A good solid joint is important for strength. You can also add gussets at this joint to the rib for more strength.
After the wing is totally dry, you will start cutting down the LE to shape with using your xacto knife like a draw blade, and then finally sand it to where you want it.
I hope this helps. I will be home in 3 days and can add some pictures. I will also show you how I plan to make my front thrust adjustment.
Mitch
PS: If you do not have a Razor Saw, I would recommend you get one with a fine blade. I use mine for cutting anything more than 1/16 sq. stock.
-
FsFalcon
- Posts: 18
- Joined: Mon Oct 07, 2013 1:54 pm
- Location: St. Paul, MN
Re: 400 series Zero 4th model
I'll second that: using a razor saw significantly "upped my game" when building. Being able to make clean, even cuts allows tighter joins and leads to a much stronger structure.PS: If you do not have a Razor Saw, I would recommend you get one with a fine blade. I use mine for cutting anything more than 1/16 sq. stock.
Of course, maybe I'm just terrible at using hobby knives for accurate work....
-
Mitch
- Posts: 1351
- Joined: Mon Aug 22, 2011 9:16 pm
- Location: Kent, WA
Re: 400 series Zero 4th model
Hello and here are the pictures I tried to post from Kodiak...
After all 3 sections are built... I prepare to make my cut:
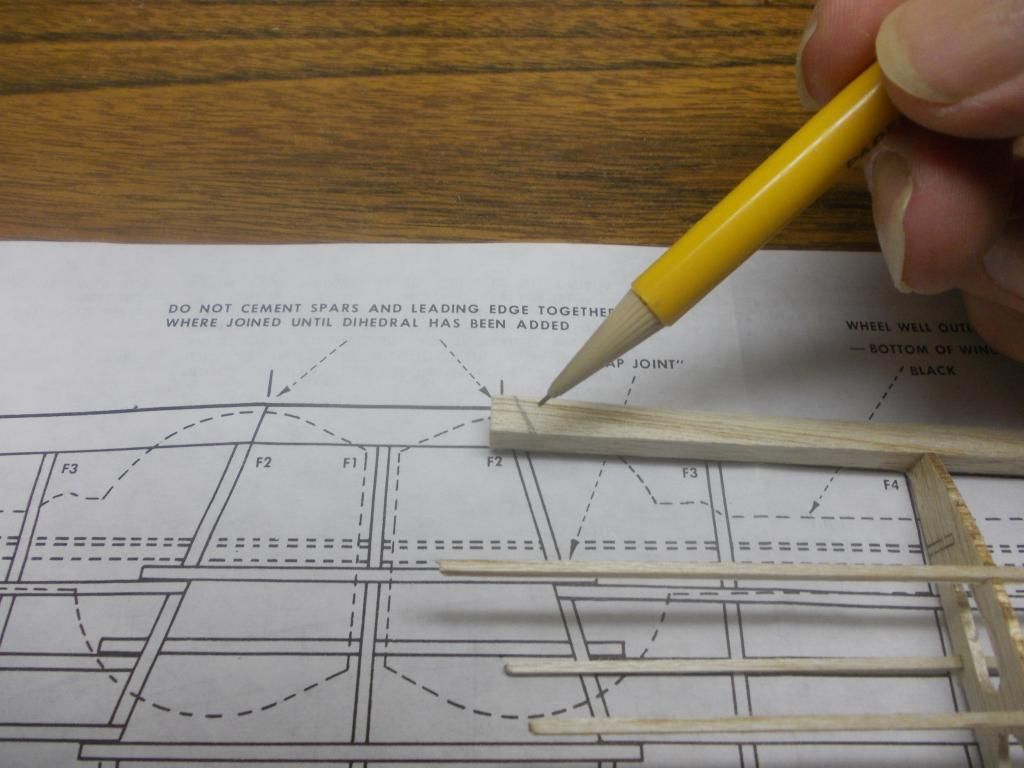
First I mark the angle as per plans.
Then I raise the wing to the desired dihedral (I go higher than plans show)
With the wing tip raised to the desired height, I make my cut. This way I have the angle and the bevel at the same time and I should have a nice fit.
Then I assemble the 3 wing parts with F2's and glue and clamp and let dry!
Mitch
After all 3 sections are built... I prepare to make my cut:

First I mark the angle as per plans.
Then I raise the wing to the desired dihedral (I go higher than plans show)

With the wing tip raised to the desired height, I make my cut. This way I have the angle and the bevel at the same time and I should have a nice fit.
Then I assemble the 3 wing parts with F2's and glue and clamp and let dry!
Mitch
-
Angie332
- Posts: 93
- Joined: Wed Jun 25, 2014 10:21 am
Re: 400 series Zero 4th model
Thank you Mitch. Your awsome. I have been so stuck on the wing. I have been just staring at it. Your help has been much needed and appreciated
-
Angie332
- Posts: 93
- Joined: Wed Jun 25, 2014 10:21 am
Re: 400 series Zero 4th model
This is the part I am stuck on at the moment. See how the 1/4 square is taller than the rest?
Do you sand the 1/4 square leading edge to match the rest. Thank you so much for any help Ihope these ppictures show y'all what I am trying to ask
Do you sand the 1/4 square leading edge to match the rest. Thank you so much for any help
You do not have the required permissions to view the files attached to this post.
-
Mitch
- Posts: 1351
- Joined: Mon Aug 22, 2011 9:16 pm
- Location: Kent, WA
Re: 400 series Zero 4th model
Angie,
Glue up the wing with the LE just like you have it. After the wing is glued up you will remove it from the plans. Then you will start cutting down the LE to shape. You can see on the plans the tapper to the wingtip. Also above and to the left on the wing plan is a 'typical wing section at rib' You can see how much you need to cut down that LE for the shape of the wing cord. It is a lot to sand off so I get it close by cutting it down with my x-acto knife first.
Also in the Building Instructions under... 2. Building the Wing Frame, everything is explained, in step 4 is says "...blend the LE into the tips..."
Mitch
PS: I am in Kodiak now and leaving tonight, a day at sea and then Dutch Harbor. No internet in Dutch. I will be home next week and start my vacation!
-
davidchoate
- Posts: 1263
- Joined: Wed Aug 14, 2013 6:41 am
- Location: PHiladelphia PA
- Contact:
Re: 400 series Zero 4th model
I will sometimes make a template of the LE and sand while checking the shape, aaaai also lately have been shimming at points to create washout. It seems that all the planes that fly well, have this, and if you look on alot of the scale pictures on the plan, they have it too. I know it helps wing tip stall, but i'm no expert. And If youre doing a 400; You may want to try powered flight? I'm not saying 4ch RC right away, But Read the topic on Cox. I always did them in the 80's, and co2 on the small bipes they dont make anymore. I have made 1meter Rc in 80's with a Cox .o49, or .o52(one had a red crankcase, ,but the Rc Cox's had a separate gas tank, but still no throttle,and that thing would pull that 3ft wing 2 ch. no problem.
-
Angie332
- Posts: 93
- Joined: Wed Jun 25, 2014 10:21 am
Re: 400 series Zero 4th model
Thanks guys. I have been studying it for days. Even took the ribs and looked at it. I think I have it finally figured out.. I think.. wish me luck
-
Angie332
- Posts: 93
- Joined: Wed Jun 25, 2014 10:21 am
Re: 400 series Zero 4th model
Well half of the wing is sanded got the other half to go. Thanks guys for the patient's
You do not have the required permissions to view the files attached to this post.
-
Angie332
- Posts: 93
- Joined: Wed Jun 25, 2014 10:21 am
Re: 400 series Zero 4th model
Well, gotta do a bit more sanding then I can tissue it. Yeppie!!
It's lookin so good hubby says best one yet happy me
It's lookin so good hubby says best one yet
You do not have the required permissions to view the files attached to this post.
-
Mitch
- Posts: 1351
- Joined: Mon Aug 22, 2011 9:16 pm
- Location: Kent, WA
Re: 400 series Zero 4th model
Hi Angie...et al...
I just got home a few hours ago and all my models are safe...(3 skeletons)
Just a suggestion on carving and sanding the LE. I would put all the stringers in before I work with the wing. The wing will be stronger and will hold up to handling better. Looks like you did just fine. I shape the wing tips at this point because I like to match up the wings and get the shapes of the wing tips the same. Then I glue the 3 parts together. When dry I finish carving the LE of the center section and the joints to the P & S wing.
Just the way I do it... Mitch
UPDATE: One more thing. In the wing you are missing one short stringer. Look at your plans. the top forward stringer stops at F12, there is no notch as F12 is very small. BUT it continues again to the wingtip. I think it is important to get a nice smooth contour of the skin at that point.
Here is a picture of what I mean:

I built my wing with half the wing ribs (weight saving)...
...and yes, it looks like I need to vacuum the carpet.
Mitch